My Bike Chain Keeps on Slipping
Having your bike chain slipping can be one of the most frustrating experiences when cycling.
Remember that time when your smooth cycle ride was rudely interrupted by that jarring feeling, as your pedals were unable to rotate due to the slipping of the chain?
Well, for many, this experience is entirely avoidable with some basic maintenance. However, if your chain repeatedly slips, there could be a more serious issue with one of your bicycle’s mechanisms.
This article aims to give you a one-stop-shop for all things related to a slipping bicycle chain. The article will first diagnose some reasons why your chain could slip, while the second part of the article provides some solutions and preventative measures you can do to prevent your bike chain slipping.
Reasons Why a Bike Chain May Slip
Using a Worn Bike Chain 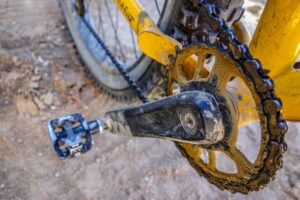
Perhaps the most common reason why a bike chain may slip is due to the age and weariness of the bike chain. A worn chain slips because the teeth on the gears won’t align to the chain, consequently causing the chain to bounce. A worn chain effectively leads to it becoming stretched, meaning the distance between the chain links differs from its original design.
If you feel your chain is slipping due to a worn bike chain and you want to check the chain-link distances, you can use a chain checker tool to help you diagnose the problem.
Dirty Chain and Sprockets
Cycling with a dirty chain and sprockets for a long period is another coming cause of bike chain slipping. The sprocket is the profiled ‘teethed’ wheel on the bike where the chain rests and rotates around. Often when cycling, particularly in muddy terrain, the sprocket can build up with mud and residue. If this is left , it will cause your chain to slip as the grip between the chain and the sprocket is loosened.
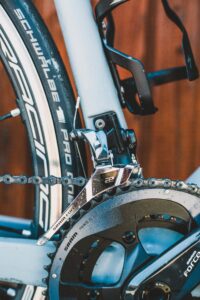
Unaligned Derailleur Pulleys and Rear Wheel Cog
Alignment issues can less immediately clear to diagnose as a reason for your chain slipping. However, they remain one of the most common reasons and are actually easier than you think to spot. The specific alignment issue affecting your chain is the derailleur pulleys and the rear wheel cog.
The first sign of an alignment issue would be when changing gear.
If you’ve ever experienced your chain repeatedly go up or down more gears than you specified, there is likely an alignment issue and your bike chain will likely slip off completely.
To check for an alignment issue is very straightforward. Simply look at your rear wheel and identify the wheel cog on which your chain rests and rotates. Now look below the wheel cog and see if the pulley cage (the metal pieces on either side of the rear derailleur pulleys) is aligned with the gear.
This quick inspection will allow you to quickly assess if an alignment issue is causing your chain to slip.
Pulley Cage
The same issues and tensions on the bike chain caused by alignment problems are also going to be caused by a bent derailleur pulley cage. You can easily assess if the derailleur pulley cage is bent by looking at it head on the rear wheel head-on. If it is bent, it will cause alignment issues and consequently a chain that slips.
Stiff Chain Links
You’ll know you have stiff chain links when cycling. If your chain skips every 3 to 4 rotations you will have stiff chain links which can lead to a frozen chain, causing it to slip. The exact cause of slipping due to the stiff chain links is due to them bring the pulleys up towards the gear which causes the chain to bounce.
Aged Cassette
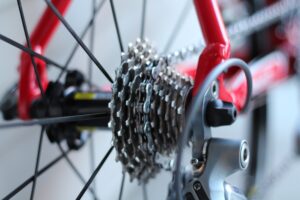
A worn-down cassette is caused when the sprockets have aged and are no longer affecting and rotating the chain. Checking the sprocket for wear visually is quite challenging so to diagnose and an aged cassette you will need a sprocket wear tool.
This tool contains chain links which can then be attached to the sprocket. To operate the tool, the wheel needs to removed from the chain and frame. Having attached the toolchain link to the sprocket, pull down on the lever to see if you can move the first couple of chain links of the sprocket. If you can, there is no cassette issue. If you cannot, the cassette is likely to be worn.
How to Fix My Slipped Bike Chain
There are many possible ways to fix a bike chain that has slipped. The most common solution is to add tension to the derailleur but sometimes even that solution will not be sufficient.
The first recommended steps to get the correct derailleur tension are detailed below in the step-by-step instructions:
- Firstly, place your bike into the parking position and manually operate the pedal with your hand or foot until the derailleur is aligned with the smallest cog. At this stage, you want to check if your chain can change gear without slipping, so change gears to see if the chain responds. If it does not, you will need to increase the tension.
- A method of increasing tension is through turning your barrel adjuster in a complete rotation away from you. If you are unsure where the barrel adjuster is located, it is the part located on the back part of the derailleur. The cable passes through the barrel adjuster when on its way to the gear shifter.
- After twisting the barrel adjuster, change gear using the gear shifter to see if the chain will automatically shift in the cassette. If the chain continues to not shift, tighten the barrel adjuster to add more tension until the bike chain starts shifting. Repeat the test multiple times until you’ve found the perfect tension balance.
- This sequence of steps should solve the majority of cases of a slipping bike change. If however, this approach is unsuccessful, the next step is to visually inspect the cable to see if there are any issues. If there is too much slack on the cable, you will likely need to tighten it further, if it is too tight, you will need to add more tension.
- In this instance, you can manually tighten the cable to the desired tension. On the derailleur, the point where the cable exits should be visible looking similar to a bolt. To increase tension, you should lift the mechanism and pull the cable, Likewise, to loosen it, simply push the cable to get more slack. Keep operating this and test to see if you change gears without the chain slipping.
- If after these tests you are still unable to correct the chain slipping issue, you should check the limiting screw. This screw is located at the top of the derailleur and should have an ‘H’ marked on it. The ‘H’ stands for a high gear. Loosening this screw should enable the chain to reach the smallest cog on the cassette and consequently ensure smooth gear transitions that do not see your chain slipping.
Other Preventative Measures You Can Follow to Prevent Your Bike Chain Slipping
There is some additional guidance below that you can follow to assist you in preventing your bike chain from slipping.
Sprocket Cleaning
A clear and simple step is cleaning your sprocket on a regular basis. If you are likely to cycle in muddy terrain this should be done more regularly compared to road cyclists. This will probably feel a bit labour-intensive but will reap the rewards. First, clean the sprocket, then re-oil the chain and check the alignment between the derailleur and the sprocket is correct and you should be good to go.
 Replace the Bent Derailleur
In cases where your derailleur is bent, you have two options. First, try to bend the derailleur back to its original position and test the bike to see if the chain slips. If this method is unsuccessful, you will likely have to replace the whole derailleur as the derailleur is beyond repair.
Fixing a Frozen Chain
For instances where your chain is frozen, the solution is quite cheap and easy to. Firstly, identify the master chain link and undo it using pliers. Secondly, re-route the chain and reattached the master link using pliers.
You can also inspect each link on the chain until you have identified the troublesome link (be prepared to get your hands dirty). Once you have found the link creating the frozen chain, apply lubricant and work it back and forth until it loosens.
Where to Buy a Bike Chain
All bike shops will have bike chains available to purchase. For those who unaware of how much bicycle chains cost, they can cost anywhere between $5 to $50 depending on the quality. They can be purchased online here at our store Pitcrewcycles.com
Final Thoughts
Hopefully, this article has given you all the essential information you need to know about the causes of a slipping bike chain and the solutions to correct it. As with most things, frequent care and attention to your bike should prevent most cases of chain slipping, with most solutions very cheap and easy to fix.